Part of my own personal creativity is the house I am renovating/building here is Spain.
I feel that the first step in sustainable building, which is what we are trying to achieve here, is to start with a building already built, therefore not requiring the use of yet more land to cover with concrete.
What I am showing here is the steps taken so far in the Post and Beam Straw Bale extension I am building on the north side of our house.
Step 1.
Landscaping the ground to make two terraced flat spaces to build on.

2 flat platforms (dug out by hand)
This was done by hand using a pick ax and a spade. It is laborious work but does not require surrounding trees and land to be destroyed to make access for a mechanical digger.
Another benefit of working by hand is that clay rich soil, rubble, large rocks and top soil can all be separated into their own specific piles, with the exception of the top soil, everything else will be used back in the build. A pain to do at this stage but if you are making a ‘handmade’ house it pays dividends later when building.
Step2
Digging out the strip foundations.
I decided to make strip foundations as most of the build is on solid rock.

Strip Foundation
The foundations are dug wider than the straw bales they will support.
Step 3
Fill the strip foundations with rubble for good drainage, and support for the stem wall.

Rubble trench
Step 4
Pour some concrete into the strips and lay a stem wall. For the stem wall you can see we
have used two rows of concrete blocks .

stem wall
After the blocks were laid, concrete pads were put in for the posts to stand on.

concrete pad
In this photo you can see the different floor heights of the rooms with the simple posts and beams in place. The bags of gravel were put in before any block work was done to save me having to wheelbarrow tons of gravel in to use as a base for the flooring.
Wall and beams built around
pre-placed bags of gravel
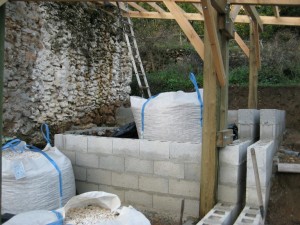

Post and Beams
Step 5
The roofs, tongue and groove, insulated and covered with EPDM roofing.

EPDM
They have not been edge trimmed yet to offer greater rain protection while building the Straw Bale walls.
The plan is to eventually create green living roofs on top of the EPDM.

Roof beams and tongue and groove.

Window Box
Step 6
Here you can see one of the boxes made to hold the window in place, at the moment there is no supporting beams for the bales that will go above the window
Step 7
The blocks have a waterproof membrane on and the ties to hold down the first row of bales have been put in.

Stem Wall with membrane and bale ties in place.
This is as far as I have got so far, the ties are my own idea and we will have to see how well they work.
To be continued …………
No comments:
Post a Comment